Installing Oracle Database on Linux using RPM packages significantly reduces deployment complexity. Many intricate configuration steps are handled automatically during the package installation. This article demonstrates the process of installing Oracle 26ai using the RPM method on RHEL 9.
1. Linux Operating System Preparation
To resolve dependency issues on RHEL, we utilize the free Oracle YUM repositories. Manually create a configuration file pointing to the latest Oracle Linux 9 sources at /etc/yum.repos.d/oracle-linux-9.repo with the following content:
[ol9_baseos_latest]name=Oracle Linux 9 BaseOS Latestbaseurl=https://yum.oracle.com/repo/OracleLinux/OL9/baseos/latest/x86_64/gpgkey=https://yum.oracle.com/RPM-GPG-KEY-oracle-ol9gpgcheck=1enabled=1[ol9_appstream]name=Oracle Linux 9 AppStreambaseurl=https://yum.oracle.com/repo/OracleLinux/OL9/appstream/x86_64/gpgkey=https://yum.oracle.com/RPM-GPG-KEY-oracle-ol9gpgcheck=1enabled=1
Upgrade Dependencies
# orce cache refreshdnf clean alldnf makecache# Upgrade essential dependency librariesdnf update fontconfig libgcc libstdc++ -y# Install the Oracle 26ai Preinstallation RPMdnf -y install oracle-ai-database-preinstall-26ai-1.0-1.el9.x86_64.rpm
2. Software Download
Installing 26ai requires two core RPM packages: the Preinstallation package and the Database Enterprise Edition package. Download them from the official Oracle link:
https://www.oracle.com/database/technologies/oracle26ai-linux-downloads.html
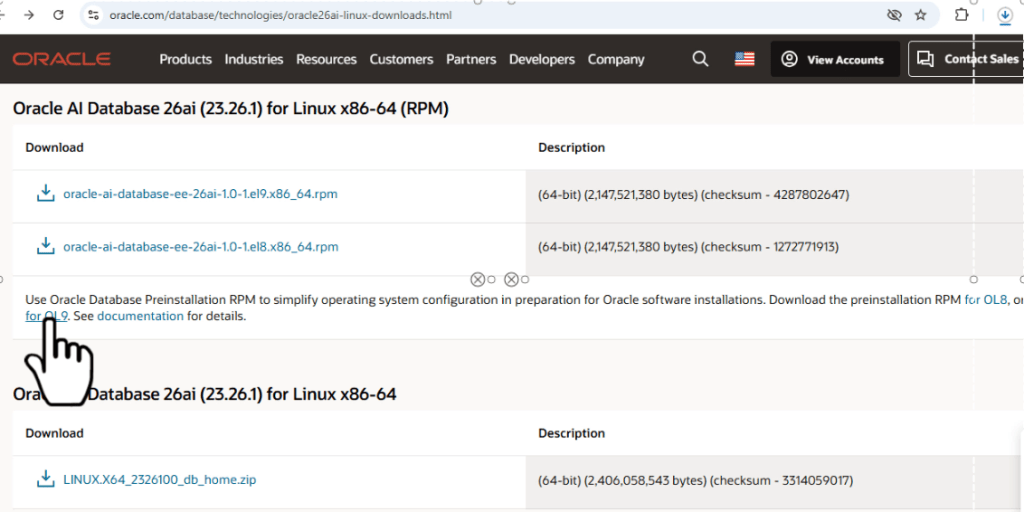
The Oracle 26ai pre-installation package is available for download on this page via the following path: https://yum.oracle.com/repo/OracleLinux/OL9/appstream/x86_64/getPackage/oracle-ai-database-preinstall-26ai-1.0-1.el9.x86_64.rpm
This page provides x86 64-bit RPM installation packages for both Linux 8 and 9 versions of 26ai. The specific package we are downloading for Linux 9 is: oracle-ai-database-ee-26ai-1.0-1.el9.x86_64.rpm
An Oracle account is required to complete the download. If you do not have an account, you can register for free.
3. RPM Package Installation
Step 3.1: Install Preinstallation RPM
# dnf -y install oracle-ai-database-preinstall-26ai-1.0-1.el9.x86_64.rpm
This package automates OS-level tuning. You can audit the results in the log file: /var/log/oracle-ai-database-preinstall-26ai/results/orakernel.log.
Automatic actions include:
- Creating the
oracleuser and management groups (oinstall,dba,oper, etc.). - Optimizing kernel parameters in
/etc/sysctl.conf. - Configuring resource limits in
/etc/security/limits.d. - Modifying boot parameters (e.g., disabling NUMA and adjusting Transparent HugePages).
Step 3.2: Install Enterprise Edition RPM
Once the environment is ready, install the main database software:
# dnf -y install oracle-ai-database-ee-26ai-1.0-1.el9.x86_64.rpm[root@rhel9 ~]# dnf -y install oracle-ai-database-ee-26ai-1.0-1.el9.x86_64.rpmUpdating Subscription Management repositories.Unable to read consumer identityThis system is not registered with an entitlement server. You can use subscription-manager to register.Last metadata expiration check: 0:52:13 ago on Thu 29 Jan 2026 09:48:21 AM CST.Dependencies resolved.========================================================================================== Package Architecture Version Repository Size==========================================================================================Installing: oracle-ai-database-ee-26ai x86_64 1.0-1 @commandline 2.0 GTransaction Summary==========================================================================================Install 1 PackageTotal size: 2.0 GInstalled size: 5.7 GDownloading Packages:Running transaction checkTransaction check succeeded.Running transaction testTransaction test succeeded.Running transaction Preparing : 1/1 Running scriptlet: oracle-ai-database-ee-26ai-1.0-1.x86_64 1/1 Installing : oracle-ai-database-ee-26ai-1.0-1.x86_64 1/1 Running scriptlet: oracle-ai-database-ee-26ai-1.0-1.x86_64 1/1[INFO] Executing post installation scripts...[INFO] Oracle home installed successfully and ready to be configured.To configure a sample Oracle AI Database, optionally modify the parameters in '/etc/sysconfig/oracledb_ORCLCDB-26ai.conf' and then run following service configuration script as root: /etc/init.d/oracledb_ORCLCDB-26ai configure Verifying : oracle-ai-database-ee-26ai-1.0-1.x86_64 1/1Installed products updated.Installed: oracle-ai-database-ee-26ai-1.0-1.x86_64Complete!
Upon completion, the installer will prompt you to run the configuration script located at /etc/init.d/oracledb_ORCLCDB-26ai configure.
4. Database Creation
The RPM installation only extracts the software. The configuration script uses DBCA in silent mode to create the instance.
Step 4.1: Prepare Data Directory
# mkdir /u01/oracle/oradata -p# chown oracle:oinstall /u01 -R
Step 4.2: Modify Configuration File
Edit /etc/sysconfig/oracledb_ORCLCDB-26ai.conf to set your data location and port
LISTENER_PORT=1521CHARSET=AL32UTF8ORACLE_DATA_LOCATION=/u01/oracle/oradataCONFIGURE_TDE=false
Step 4.3: Execute Configuration Script
Run the following as root to trigger the silent database creation
[root@rhel9 ~]# /etc/init.d/oracledb_ORCLCDB-26ai configure/opt/oracle/product/26ai/dbhome_1/bin/dbca -silent -createDatabase -gdbName ORCLCDB -templateName General_Purpose.dbc -characterSet AL32UTF8 -createAsContainerDatabase true -numberOfPDBs 1 -pdbName ORCLPDB1 -createListener LISTENER:1521 -datafileDestination /u01/oracle/oradata -sid ORCLCDB -autoGeneratePasswordsConfiguring Oracle AI Database ORCLCDB.Prepare for db operation8% completeCopying database files31% completeCreating and starting Oracle instance32% complete36% complete39% complete42% complete46% completeCompleting Database Creation51% complete53% complete54% completeCreating Pluggable Databases58% complete77% completeExecuting Post Configuration Actions100% completeDatabase creation complete. For details check the logfiles at:/opt/oracle/cfgtoollogs/dbca/ORCLCDB.Database Information:Global Database Name:ORCLCDBSystem Identifier(SID):ORCLCDBLook at the log file "/opt/oracle/cfgtoollogs/dbca/ORCLCDB/ORCLCDB.log" for further details.Database configuration completed successfully. The passwords were auto generated, you must change them by connecting to the database using 'sqlplus / as sysdba' as the oracle user.
As seen from the output of this command, the process essentially invokes DBCA in silent mode to perform the database creation. You can use this command as a reference when writing your database creation scripts. Since there are numerous parameters involved, you can use the following command to explore their specific usage and syntax:
$ /opt/oracle/product/26ai/dbhome_1/bin/dbca -help -createDatabase
5. Post-Installation Verification
Configure environment variables in the oracle user’s .bash_profile to ensure they persist:
ORACLE_BASE=/opt/oracleORACLE_HOME=/opt/oracle/product/26ai/dbhome_1ORACLE_SID=ORCLCDBPATH=$ORACLE_HOME/bin:$PATHexport ORACLE_BASE ORACLE_HOME ORACLE_SID PATH
Login and Validate
Use SQL*Plus to check the status:
[oracle@rhel9 ~]$ sqlplus / as sysdbaSQL*Plus: Release 23.26.1.0.0 - Production on Thu Jan 29 14:28:18 2026Version 23.26.1.0.0Copyright (c) 1982, 2025, Oracle. All rights reserved.Connected to:Oracle AI Database 26ai Enterprise Edition Release 23.26.1.0.0 - ProductionVersion 23.26.1.0.0SQL> show pdbs; CON_ID CON_NAME OPEN MODE RESTRICTED---------- ------------------------------ ---------- ---------- 2 PDB$SEED READ ONLY NO 3 ORCLPDB1 READ WRITE NOSQL> select 1; 1---------- 1
In the next article, we will explore the installation of Oracle 26ai using the traditional ZIP archive method.


Leave a comment