In production, building an Oracle RAC meant investing in an expensive Fibre Channel or iSCSI SAN (Storage Area Network) with dedicated physical hardware—costing thousands of dollars. For years, the “poor man’s” RAC was to use VMware with the multi-writer flag, Since VMware vSphere/ESXi is no longer truly free (the free version has limited features now), many people are switching to Proxmox for Oracle RAC labs.
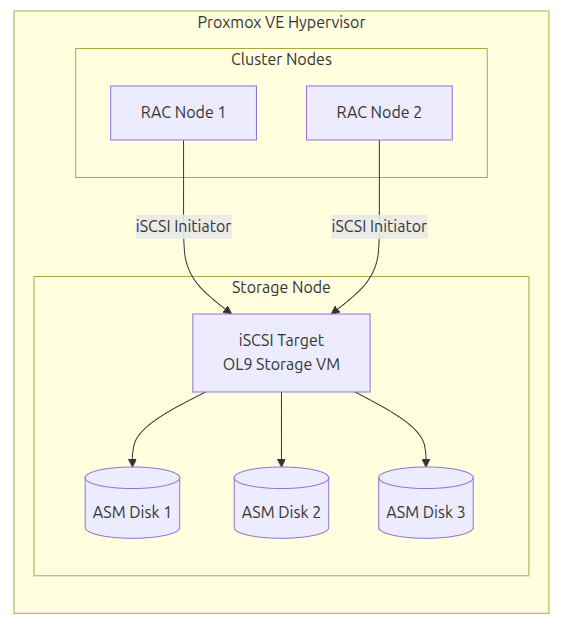
For a real poor man, Proxmox is 100% free with no feature restrictions. Like RAC on other platform, the most important obstacle on Proxmox is to provide shared disks for ASM, The best practice for this is using iSCSI, not direct shared VM disks, this can be achieved by a storage VM which run targetcli to provide shared LUNs for ASM. The following diagram illustrate this solution:
IP Address Allocation Table
| Hostname | Public IP | iSCSI IP | Private IP | Virtual IP (VIP) | SCAN IP |
|---|---|---|---|---|---|
| AI261 | 203.0.113.86 | 198.51.100.86 | 192.0.2.86 | 203.0.113.28 | 203.0.113.85 |
| AI262 | 203.0.113.87 | 198.51.100.87 | 192.0.2.87 | 203.0.113.29 | (Shared) |
| ASM-DISKS | 203.0.113.88 | 198.51.100.88 |
Phase 1: Preparing the Storage VM
- configuration of storage sever
We first create a VM on proxmox to provide shared disk via iSCSI, the hardware for this sever is as below:
import things:
there are three disks used for shared ASM disk , set write back
the net1 is used for iSCSI private network , vmbr1, no physical NIC.
Before storage can be exported, the environment needs a solid network foundation. On the Storage VM, we configure a private network for iSCSI .
2. Private Storage Network Setup:
We skip the process of install Oracle Linux 9 on this sever, as this is nothing special. After the OS installation, we configure ens 19 for iSCSI private network as below:
[yuan@localhost ~]$ sudo nmcli connection add type ethernet con-name iscsi-private ifname ens19 ipv4.addresses 198.51.100.88/24 ipv4.method manualConnection 'iscsi-private' (35c4bcbe-5dc7-4d34-918b-bd1894d2a3f9) successfully added.[yuan@localhost ~]$ sudo nmcli connection up iscsi-privateConnection successfully activated (D-Bus active path: /org/freedesktop/NetworkManager/ActiveConnection/7)[yuan@localhost ~]$ nmcli device statusDEVICE TYPE STATE CONNECTIONens18 ethernet connected ens18ens19 ethernet connected iscsi-privatelo loopback connected (externally) lo
Phase 2: Configuring the iSCSI Target
Using targetcli, we create the shared block devices. We use “Demo Mode” to bypass complex ACL management, making the lab “workable” for multiple RAC nodes immediately.
1. Creating the Shared LUNs:
We use device IDs, which can be idenfied by in /dev/disk/by-id directory, to configure iSCSC target, we do not use device name (such as: /dev/sda), which can be changed after rebooting.
root@ASM-DISKS ~]# targetcli/> cd /backstores/block//backstores/block> create name=asm_disk1 dev=/dev/disk/by-id/scsi-0QEMU_QEMU_HARDDISK_drive-scsi1Created block storage object asm_disk1 using /dev/disk/by-id/scsi-0QEMU_QEMU_HARDDISK_drive-scsi1./backstores/block> create name=asm_disk2 dev=/dev/disk/by-id/scsi-0QEMU_QEMU_HARDDISK_drive-scsi2Created block storage object asm_disk2 using /dev/disk/by-id/scsi-0QEMU_QEMU_HARDDISK_drive-scsi2./backstores/block> create name=asm_disk3 dev=/dev/disk/by-id/scsi-0QEMU_QEMU_HARDDISK_drive-scsi3Created block storage object asm_disk3 using /dev/disk/by-id/scsi-0QEMU_QEMU_HARDDISK_drive-scsi3./> /iscsi create iqn.2026-05.com.oracle:storage.target1Created target iqn.2026-05.com.oracle:storage.target1.Created TPG 1./> /iscsi/iqn.2026-05.com.oracle:storage.target1/tpg1/luns create /backstores/block/asm_disk1Created LUN 0./> /iscsi/iqn.2026-05.com.oracle:storage.target1/tpg1/luns create /backstores/block/asm_disk2Created LUN 1./> /iscsi/iqn.2026-05.com.oracle:storage.target1/tpg1/luns create /backstores/block/asm_disk3Created LUN 2.# Enable permissive access for the lab/> /iscsi/iqn.2026-05.com.oracle:storage.target1/tpg1 set attribute generate_node_acls=1 demo_mode_write_protect=0 cache_dynamic_acls=1Parameter generate_node_acls is now '1'.Parameter demo_mode_write_protect is now '0'.Parameter cache_dynamic_acls is now '1'.# Bind to the Private Storage IP/> /iscsi/iqn.2026-05.com.oracle:storage.target1/tpg1/portals delete 0.0.0.0 3260/> /iscsi/iqn.2026-05.com.oracle:storage.target1/tpg1/portals create 198.51.100.88 3260/> saveconfig/> exit
2. Finalizing Service and Security:
To ensure the disks are reachable and the settings survive a reboot, we disable the firewall and enable the target service.
[root@ASM-DISKS ~]# sudo systemctl stop firewalld[root@ASM-DISKS ~]# sudo systemctl disable firewalld[root@ASM-DISKS ~]# sudo systemctl enable targetCreated symlink /etc/systemd/system/multi-user.target.wants/target.service → /usr/lib/systemd/system/target.service.
Phase 3: Connecting the RAC Node
On the first RAC node (AI26-1), we connect to the storage via the private network.
1. Network and Connectivity Test:
[root@AI26-1 ~]# nmcli connection add type ethernet con-name iscsi-private ifname ens19 ipv4.addresses 198.51.100.86/24 ipv4.method manual[root@AI26-1 ~]# nmcli connection up iscsi-private[root@AI26-1 ~]# ping 198.51.100.88PING 198.51.100.88 (198.51.100.88) 56(84) bytes of data.64 bytes from 198.51.100.88: icmp_seq=1 ttl=64 time=1.02 ms
2. Discovery and Login:
[root@AI26-1 ~]# iscsiadm -m discovery -t sendtargets -p 198.51.100.88198.51.100.88:3260,1 iqn.2026-05.com.oracle:storage.target1[root@AI26-1 ~]# iscsiadm -m node -L allLogin to [iface: default, target: iqn.2026-05.com.oracle:storage.target1, portal: 198.51.100.88,3260] successful.
3. Verifying the Shared Disks:
[root@AI26-1 ~]# lsblkNAME MAJ:MIN RM SIZE RO TYPE MOUNTPOINTSsda 8:0 0 150G 0 disk├─sda1 8:1 0 1G 0 part /boot└─sda2 8:2 0 149G 0 part ├─ol-root 252:0 0 70G 0 lvm / ├─ol-swap 252:1 0 7.7G 0 lvm [SWAP] └─ol-home 252:2 0 71.3G 0 lvm /homesdb 8:16 0 80G 0 disksdc 8:32 0 80G 0 disksdd 8:48 0 40G 0 disksr0 11:0 1 13.5G 0 rom
We have successfully established a highly available, shared block storage layer using Proxmox and native Linux tools.
The remaining steps are same as https://byte-way.com/2026/02/04/step-by-step-installing-oracle-26ai-rac-database-on-linux-using-vmware/


Leave a comment